423de2950022.md
本文仅供教育目的,切勿用于非法活动。"
date: 2025-05-28
author: "Mateusz Jurczyk"
tags: ["安全漏洞", "权限提升", "Windows安全", "攻击研究", "UAF", "CVE", "硬件安全", "Web安全"]
categories: ["网络安全", "攻击研究", "浏览器安全"]
excerpt: "作者:Mateusz Jurczyk,Google Project Zero
在上一篇博客文章中,我们重点分析了注册表的整体安全性..."
url: https://projectzero.google/2025/05/the-windows-registry-adventure-8-exploitation.html
作者:Mateusz Jurczyk,Google Project Zero
在上一篇博客文章中,我们重点讨论了注册表的总体安全分析以及如何有效地寻找其中的漏洞。在这里,我们将把注意力转向基于注册表配置单元(hive)的内存损坏漏洞的利用,即那些允许攻击者覆盖内存中活动配置单元映射内数据的漏洞。这是 Windows 注册表特有的一类问题,但又足够普遍,以至于本文描述的技术适用于我过去发现的17个漏洞,也可能适用于未来任何类似的漏洞。我们知道,配置单元在底层内存管理(它们如何以及在何处映射到内存中)、自定义分配器对已分配和已释放内存块的处理方式以及存储数据的性质方面表现出非常特殊的行为。所有这些都使得从攻击性安全的角度来看,利用这类漏洞特别有趣,这也是我想在此详细描述的原因。
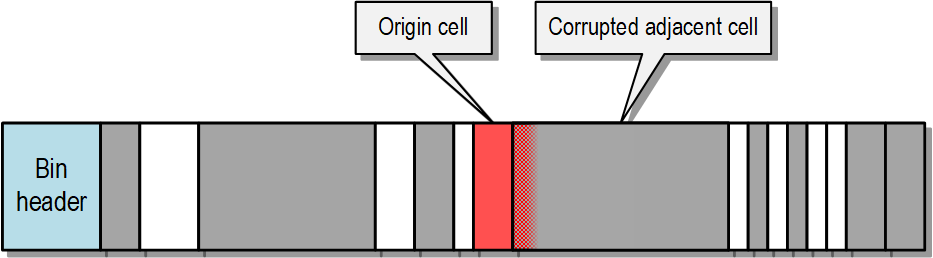
与任何其他类型的内存损坏一样,绝大多数配置单元内存损坏问题可以分为两类:空间违规(例如缓冲区溢出):
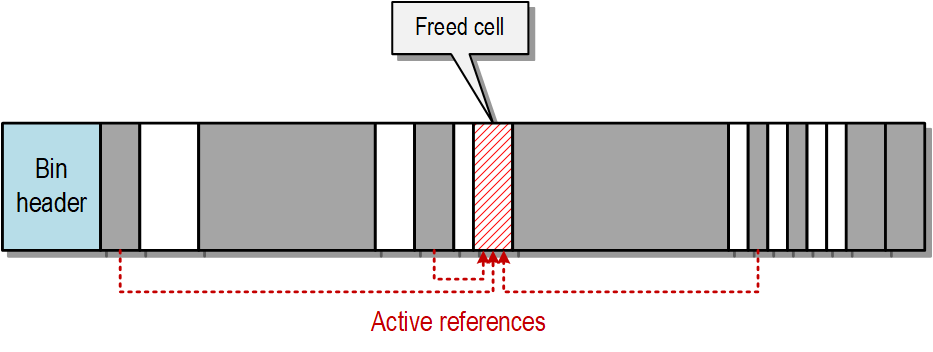
和时间违规,例如释放后重用(use-after-free)条件:
在这篇文章中,我们将致力于选择一个最有希望的漏洞候选者,然后为其创建一个分步利用程序,将普通用户的权限从中等完整性级别(Medium IL)提升到系统级权限。我们的目标是 Windows 11,还有一个额外要求是成功绕过所有现代安全缓解措施。我之前在 OffensiveCon 2024 上就此主题做过演讲,标题为"Windows 内核中注册表漏洞的实用利用",这篇博客文章可以看作是该演讲信息的补充和扩展。对该主题有浓厚兴趣的读者可以查看该演讲的幻灯片和录像。
从哪里开始:潜在选项的高级概述
让我们先回顾一些关键点。你可能还记得,Windows 注册表单元分配器(即内部的 HvAllocateCell、HvReallocateCell 和 HvFreeCell 函数)的运作方式非常有利于利用。首先,它完全缺乏任何针对内存损坏的防护措施;其次,它没有任何随机性元素,使其行为完全可预测。因此,无需采用任何典型的堆利用技术,如"配置单元喷射"(hive spraying)或其他类似技术——如果我们能在测试机器上实现所需的单元布局,那么在其他计算机上无需任何额外步骤即可重现。一个潜在的例外可能是对 HKLM 和 HKU 中的全局共享配置单元进行攻击,因为我们不知道它们的初始状态,并且其他应用程序并发执行的操作可能会带来一些随机性。尽管如此,即使这样也不应该构成特别重大的挑战。我们可以放心地假设,安排配置单元的内存布局是直接的,如果我们对其具有某种内存损坏能力,只要有耐心和实验,最终将能够覆盖任何类型的单元。
经典内存损坏漏洞的利用通常涉及以下步骤:
- 初始内存损坏原语
- ???
- ???
- ???
- 获利(以任意代码执行、权限提升等形式)
漏洞利用开发者的任务是填补此列表中的空白,设计出通向预期目标的中间步骤。通常会有几个这样的中间步骤,因为考虑到当前的安全状态和缓解措施,漏洞很少能直接从内存损坏一步到位地导致代码执行。相反,采用的是逐步发展越来越强大原语的策略,例如,最终的利用链可能如下所示:
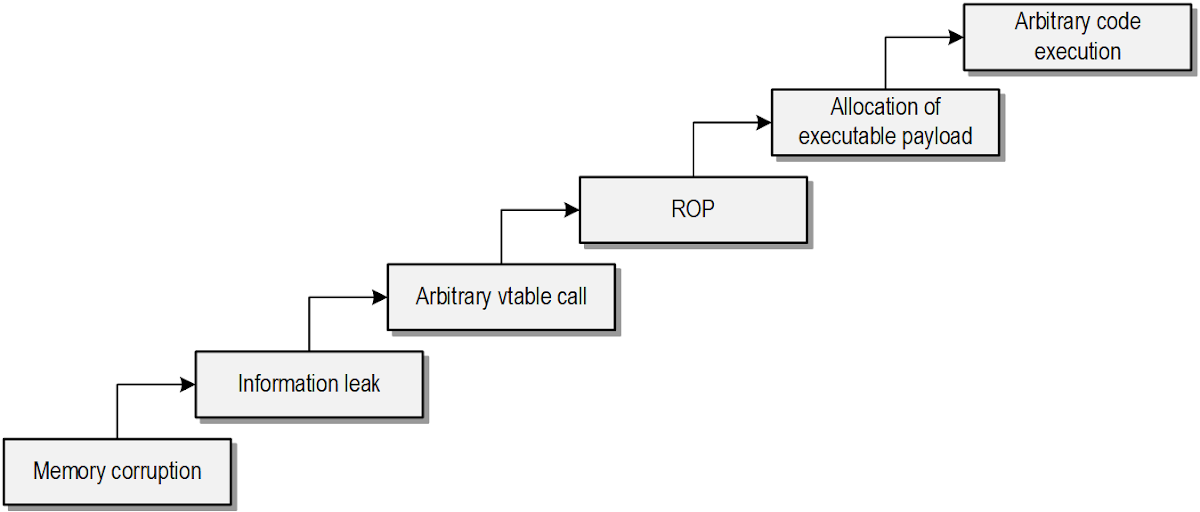
在此模型中,第二/第三步是通过找到另一个有趣的对象,安排它分配在被覆盖的缓冲区附近,然后以某种方式损坏它以创建新的原语来实现的。然而,就配置单元而言,我们在这方面的选择似乎有限:我们假设可以完全控制配置单元中任何单元的表示,但问题是从利用的角度来看,它们中没有任何立即有趣的数据。例如,regf 格式不包含任何直接影响控制流的数据(例如函数指针),也不包含任何其他可以以某种巧妙方式覆盖以改进原始原语的虚拟内存地址。下图描绘了我们当前的情况:
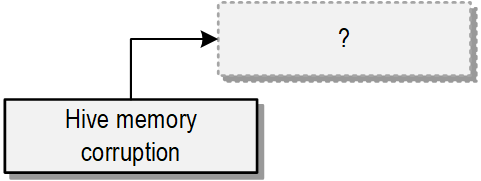
这是否意味着配置单元内存损坏无法被利用,它唯一允许的就是在孤立的配置单元内存视图中损坏数据?并非完全如此。在以下小节中,我们将仔细考虑各种想法,探讨控制内部配置单元数据如何对系统的整体安全产生更广泛的影响。然后,我们将尝试确定哪种可用方法最适合在实际漏洞利用中使用。
配置单元内部损坏
让我们首先研究覆盖内部配置单元数据是否像最初看起来那样不切实际。
在特权系统配置单元中执行仅限配置单元的攻击
需要明确的是,说配置单元不包含任何值得覆盖的数据并不完全准确。仔细想想,情况恰恰相反——注册表存储了大量的系统配置、注册服务信息、用户密码等等。唯一的问题是,所有这些关键数据都位于特定的配置单元中,即那些挂载在 HKEY_LOCAL_MACHINE 下的配置单元,以及 HKEY_USERS 中的一些配置单元(例如,HKU.Default,对应于 System 用户的私有配置单元)。要能够仅通过损坏 regf 格式数据(无需访问其他内核内存或实现任意代码执行)成功执行攻击并提升权限,必须满足两个条件:
- 漏洞必须仅通过 API/系统调用即可触发,并且不能要求对配置单元进行二进制控制,因为我们显然对任何系统配置单元都没有这种控制。
- 目标配置单元必须至少包含一个具有足够宽松访问权限的键,允许非特权用户创建值(KEY_SET_VALUE 权限)和/或新的子键(KEY_CREATE_SUB_KEY)。根据特定漏洞的先决条件,可能还需要其他一些访问权限。
在上述两点中,第一点无疑更难满足。许多配置单元内存损坏漏洞源于配置单元结构中奇怪的、不可预见的状态,这种状态只能通过从完全控制给定文件开始的"离线"方式生成。仅限 API 的漏洞似乎相对罕见:例如,在我发现的 17 个基于配置单元的内存损坏案例中,理论上只有不到一半(具体来说是8 个)可以仅通过对现有配置单元的操作来触发。此外,仔细观察会发现,其中一些不满足针对系统配置单元所需的其他条件(例如,它们只影响差异配置单元),或者非常不切实际,例如需要分配超过 500 GB 的内存,或者需要数小时才能触发。实际上,在广泛的漏洞中,只有两个非常适合直接攻击系统配置单元:CVE-2023-23420(在报告的"操作事务性重命名键的子键"部分讨论)和CVE-2023-23423(在"使用 CmpFreeKeyByCell 释放键节点的浅拷贝"部分讨论)。
关于第二个问题——可写键的可用性——攻击者的情况要好得多。这有三个原因:
- 要成功对系统键执行仅数据攻击,我们通常不限于一个特定的配置单元,而是可以选择任何适合我们的配置单元。利用大多数(如果不是全部)挂载在 HKLM 下的配置单元中的配置单元损坏,将使攻击者能够提升权限。
- Windows 内核内部通过首先在注册表树中进行完整路径查找,然后才检查所需的用户权限来实现键打开过程。访问检查仅针对特定键的安全描述符执行,而不考虑其祖先键。这意味着,为键设置过于宽松的安全设置会自动使其容易受到攻击,因为根据此逻辑,即使其祖先键具有更严格的访问控制,它也不会从它们那里获得额外的保护。
- 在 HKLM\SOFTWARE 和 HKLM\SYSTEM 配置单元中存在大量用户可写的键。它们在 HKLM\BCD00000000、HKLM\SAM 或 HKLM\SECURITY 中不存在,但正如我上面提到的,只要有一个这样的键就足以成功利用。
要找到此类公开可访问键的具体示例,需要编写自定义工具。该工具应首先递归列出低级路径 \Registry\Machine 和 \Registry\User 中的所有现有键,同时以尽可能高的权限(理想情况下是 System 用户)运行。这将确保进程可以看到注册表树中的所有键——即使是那些隐藏在受限父键后面的键。尝试枚举 \Registry\A 的子键是不值得的,因为 Windows 内核会无条件地阻止对它的任何引用。同样,除非对攻击容器化应用程序使用的差异配置单元感兴趣,否则 \Registry\WC 可能可以跳过。一旦我们有了所有键的完整列表,下一步就是验证其中哪些键可以被非特权用户写入。这可以通过读取它们的安全描述符(使用RegGetKeySecurity)并手动检查其访问权限(使用AccessCheck)来实现,或者完全将此任务委托给内核,只需在具有常规用户权限的情况下尝试以所需权限打开每个键。无论哪种情况,我们最终都应该能够获得可用于损坏系统配置单元的潜在键列表。
根据我的测试,在当前 Windows 11 系统中,HKLM 内大约有 1678 个键授予普通用户创建子键的权限。其中,1660 个位于 HKLM\SOFTWARE,18 个位于 HKLM\SYSTEM。一些例子包括:
HKLM\SOFTWARE\Microsoft\CoreShell
HKLM\SOFTWARE\Microsoft\DRM
HKLM\SOFTWARE\Microsoft\Input\Locales(及其一些子键)
HKLM\SOFTWARE\Microsoft\Input\Settings(及其一些子键)
HKLM\SOFTWARE\Microsoft\Shell\Oobe
HKLM\SOFTWARE\Microsoft\Shell\Session
HKLM\SOFTWARE\Microsoft\Tracing(及其一些子键)
HKLM\SOFTWARE\Microsoft\Windows\UpdateApi
HKLM\SOFTWARE\Microsoft\WindowsUpdate\UX
HKLM\SOFTWARE\WOW6432Node\Microsoft\DRM
HKLM\SOFTWARE\WOW6432Node\Microsoft\Tracing
HKLM\SYSTEM\Software\Microsoft\TIP(及其一些子键)
HKLM\SYSTEM\ControlSet001\Control\Cryptography\WebSignIn\Navigation
HKLM\SYSTEM\ControlSet001\Control\MUI\StringCacheSettings
HKLM\SYSTEM\ControlSet001\Control\USB\AutomaticSurpriseRemoval
HKLM\SYSTEM\ControlSet001\Services\BTAGService\Parameters\Settings
正如我们所见,可能性相当多。列表中的第二个键 HKLM\SOFTWARE\Microsoft\DRM,在过去有些流行,因为 James Forshaw 曾用它来演示他在 2019-2020 年发现的两个漏洞(CVE-2019-0881、CVE-2020-1377)。随后,我也用它来触发与注册表虚拟化相关的某些行为(CVE-2023-21675、CVE-2023-21748、CVE-2023-35357),并作为填充 SOFTWARE 配置单元至其容量从而引发 OOM 条件以利用另一个漏洞(CVE-2023-32019)的潜在途径。这个键的主要优点是它存在于所有现代系统版本中(至少从 Windows 7 开始),并且它向所有用户(Everyone 组,也称为 World 或 S-1-1-0)授予广泛的权限。上面提到的其他键也允许普通用户进行写操作,但它们通常通过其他可能更受限制的组来实现,例如 Interactive(S-1-5-4)、Users(S-1-5-32-545)或 Authenticated Users(S-1-5-11),这一点可能需要记住。
除了全局系统配置单元,我还发现了一个有趣的情况:HKCU\Software\Microsoft\Input\TypingInsights 键存在于每个用户的配置单元中,它允许系统内所有其他用户进行读写访问。我在 2023 年 12 月向微软报告了此问题(报告链接),但被认为严重性较低,到目前为止尚未修复。这个决定在某种程度上是可以理解的,因为该行为对系统安全没有直接、严重的后果,但它仍然可以作为一种有用的利用技术。由于任何用户都可以在任何其他用户的用户配置单元中打开一个键进行写入,他们获得了以下能力:
- 填满该配置单元的整个 2 GiB 空间,导致 DoS 条件(用户及其应用程序无法写入 HKCU),并可能启用与配置单元内错误处理 OOM 条件相关的漏洞利用。
- 不仅可以写入 HKCU 本身的"TypingInsights"键,还可以写入覆盖在其上的差异配置单元中的任何对应键。这提供了攻击以该用户权限在应用程序/服务器隔离中运行的应用程序的机会。
- 不仅对系统配置单元执行基于配置单元的内存损坏攻击,还可以对特定用户的配置单元执行此类攻击,从而实现更横向的权限提升场景。
正如所展示的,即使单个注册表键的安全描述符中存在看似微小的弱点,也可能对系统安全产生重大影响。
总之,使用配置单元内存损坏攻击系统配置单元当然是可能的,但需要找到一个非常好的漏洞,该漏洞可以在现有键上触发,而无需加载自定义配置单元。这是一个很好的起点,但也许我们可以找到一种更通用的技术。
滥用 regf 不一致性触发内核池损坏
虽然内存中的配置单元映射在某种程度上是隔离且自包含的,但它们并非存在于真空中。Windows 内核在内核池空间中分配和管理许多与注册表相关的附加对象,正如在博客文章#6中讨论的那样。这些对象通过数据缓存实现优化,并帮助实现某些仅通过对配置单元空间的操作无法实现的功能(例如,事务、分层键)。其中一些对象是长期存在的,只要配置单元挂载,就会保留在内存中。其他缓冲区在同一系统调用内分配并立即释放,仅用作临时数据存储。所有这些对象的内存安全性与配置单元映射中相应数据的一致性密切相关。在内核在 CmCheckRegistry 和相关函数中仔细验证配置单元有效性之后,它假设注册表配置单元的数据与其自身结构及关联的辅助结构保持一致。
对于潜在的攻击者来说,这意味着配置单元内存损坏可能升级为某些形式的池损坏。这为利用提供了更广泛的选择,因为内核的各个部分使用了各种池分配。事实上,我甚至在我的微软报告中利用了这种行为:在每次安全描述符的释放后重用(use-after-free)案例中,我会启用 Special Pool 并通过 _CM_KEY_CONTROL_BLOCK.CachedSecurity 字段触发对池上该描述符缓存副本的引用。我这样做是因为,与访问配置单元中已释放但仍映射的单元相比,通过访问池中已释放的分配来生成可靠可重现的崩溃要容易得多。
然而,这肯定不是通过修改 regf 格式的内部数据来导致池内存损坏的唯一方法。另一个想法是,例如,在配置单元中创建一个非常长的"大数据"值(在版本 ≥ 1.4 的配置单元中超过 ~16 KiB),然后使 _CM_KEY_VALUE.DataLength 与 _CM_BIG_DATA.Count 字段不一致,该字段表示后备缓冲区中 16KB 块的数量。如果我们查看内部 CmpGetValueData 函数的实现,很容易看出它基于前一个值分配一个分页池缓冲区,然后基于后一个值将数据复制到其中。因此,如果我们将 _CM_KEY_VALUE.DataLength 设置为小于 16344 × (_CM_BIG_DATA.Count - 1) 的数字,那么下次请求该值的数据时,将发生线性池缓冲区溢出。
这种类型的原语很有前途,因为它打开了针对比之前可能更广泛的内存对象的大门。下一步可能涉及找到一个合适的对象放置在被覆盖的缓冲区之后(例如,管道属性,如 2020 年这篇文章中所述),然后损坏它以实现更强大的原语,如任意内核读/写。简而言之,这种攻击将归结为相当通用的基于池的内存损坏利用,这是一个在现有资源中广泛讨论的主题。我们不会在这里进一步探讨,而是鼓励感兴趣的读者自行研究。
配置单元间内存损坏
到目前为止,在我们的分析中,我们假设基于配置单元的内存损坏漏洞只能修改我们正在操作的特定配置单元内的数据。然而,在实践中,情况不一定如此,因为可能还有其他数据位于我们配置单元映射在内存中的紧邻位置。如果发生这种情况,使用线性缓冲区溢出可能可以无缝跨越原始配置单元和更高内存地址中一些更有趣对象之间的边界。在以下部分中,我们将研究两种这样的场景:一种是受攻击配置单元的映射位于"注册表"进程的用户模式空间,另一种是它驻留在内核地址空间。
注册表进程用户空间中的其他配置单元映射
在注册表进程的用户空间中映射配置单元的节视图是绝大多数注册表的默认行为。内存中各个映射的布局可以很容易地从 WinDbg 中观察到。为此,找到注册表进程(通常是系统进程列表中的第二个),切换到其上下文,然后发出!vad命令。执行这些操作的示例如下。
0: kd> !process 0 0
**** NT ACTIVE PROCESS DUMP ****
PROCESS ffffa58fa069f040
SessionId: none Cid: 0004 Peb: 00000000 ParentCid: 0000
DirBase: 001ae002 ObjectTable: ffffe102d72678c0 HandleCount: 3077.
Image: System
PROCESS ffffa58fa074a080
SessionId: none Cid: 007c Peb: 00000000 ParentCid: 0004
DirBase: 1025ae002 ObjectTable: ffffe102d72d1d00 HandleCount:
Image: Registry
[...]
0: kd> .process ffffa58fa074a080
Implicit process is now ffffa58fa074a080
WARNING: .cache forcedecodeuser is not enabled
0: kd> !vad
VAD Level Start End Commit
ffffa58fa207f740 5 152e7a20 152e7a2f 0 Mapped READONLY \Windows\System32\config\SAM
ffffa58fa207dbc0 4 152e7a30 152e7b2f 0 Mapped READONLY \Windows\System32\config\DEFAULT
ffffa58fa207dc60 5 152e7b30 152e7b3f 0 Mapped READONLY \Windows\System32\config\SECURITY
ffffa58fa207d940 3 152e7b40 152e7d3f 0 Mapped READONLY \Windows\System32\config\SOFTWARE
ffffa58fa207dda0 5 152e7d40 152e7f3f 0 Mapped READONLY \Windows\System32\config\SOFTWARE
[...]
ffffa58fa207e840 5 152ec940 152ecb3f 0 Mapped READONLY \Windows\System32\config\SOFTWARE
ffffa58fa207b780 3 152ecb40 152ecd3f 0 Mapped READONLY \Windows\System32\config\SOFTWARE
ffffa58fa0f98ba0 5 152ecd40 152ecd4f 0 Mapped READONLY \EFI\Microsoft\Boot\BCD
ffffa58fa3af5440 4 152ecd50 152ecd8f 0 Mapped READONLY \Windows\ServiceProfiles\NetworkService\NTUSER.DAT
ffffa58fa3bfe9c0 5 152ecd90 152ecdcf 0 Mapped READONLY \Windows\ServiceProfiles\LocalService\NTUSER.DAT
ffffa58fa3ca3d20 1 152ecdd0 152ece4f 0 Mapped READONLY \Windows\System32\config\BBI
ffffa58fa2102790 6 152ece50 152ecf4f 0 Mapped READONLY \Users\user\NTUSER.DAT
ffffa58fa4145640 5 152ecf50 152ed14f 0 Mapped READONLY \Windows\System32\config\DRIVERS
ffffa58fa4145460 6 152ed150 152ed34f 0 Mapped READONLY \Windows\System32\config\DRIVERS
ffffa58fa412a520 4 152ed350 152ed44f 0 Mapped READONLY \Windows\System32\config\DRIVERS
ffffa58fa412c5a0 6 152ed450 152ed64f 0 Mapped READONLY \Users\user\AppData\Local\Microsoft\Windows\UsrClass.dat
ffffa58fa4e8bf60 5 152ed650 152ed84f 0 Mapped READONLY \Windows\appcompat\Programs\Amcache.hve
In the listing above, the "Start" and "End" columns show the starting and ending addresses of each mapping divided by the page size, which is 4 KiB. In practice, this means that the SAM hive is mapped at 0x152e7a20000 – 0x152e7a2ffff, the DEFAULT hive is mapped at 0x152e7a30000 – 0x152e7b2ffff, and so on. We can immediately see that all the hives are located very close to each other, with practically no gaps in between them.
However, this example does not directly demonstrate whether it's possible to place, for instance, the mapping of the SOFTWARE hive directly after the mapping of an app hive loaded by a normal user. The addresses of the system hives appear to be already determined, and there isn't much space between them to inject our own data. Fortunately, hives can grow dynamically, especially when you start writing long values to them. This leads to the creation of new bins and mapping them at new addresses in the Registry process's memory.
For testing purposes, I wrote a simple program that creates consecutive values of 0x3FD8 bytes within a given key. This triggers the allocation of new bins of exactly 0x4000 bytes: 0x3FD8 bytes of data plus 0x20 bytes for the _HBIN structure, 4 bytes for the cell size, and 4 bytes for padding. Next, I ran two instances of it in parallel on an app hive and HKLM\SOFTWARE, filling the former with the letter "A" and the latter with the letter "B". The result of the test was immediately visible in the memory layout:
0: kd> !vad
VAD Level Start End Commit
ffffa58fa67b44c0 8 15280000 152801ff 0 Mapped READONLY \Windows\System32\config\SOFTWARE
ffffa58fa67b5b40 7 15280200 152803ff 0 Mapped READONLY \Users\user\Desktop\test.dat
ffffa58fa67b46a0 8 15280400 152805ff 0 Mapped READONLY \Windows\System32\config\SOFTWARE
ffffa58fa67b6540 6 15280600 152807ff 0 Mapped READONLY \Users\user\Desktop\test.dat
ffffa58fa67b5dc0 8 15280800 152809ff 0 Mapped READONLY \Windows\System32\config\SOFTWARE
ffffa58fa67b4560 7 15280a00 15280bff 0 Mapped READONLY \Users\user\Desktop\test.dat
ffffa58fa67b6900 8 15280c00 15280dff 0 Mapped READONLY \Windows\System32\config\SOFTWARE
ffffa58fa67b5280 5 15280e00 15280fff 0 Mapped READONLY \Users\user\Desktop\test.dat
ffffa58fa67b5e60 8 15281000 152811ff 0 Mapped READONLY \Windows\System32\config\SOFTWARE
ffffa58fa67b7800 7 15281200 152813ff 0 Mapped READONLY \Users\user\Desktop\test.dat
ffffa58fa67b8de0 8 15281400 152815ff 0 Mapped READONLY \Windows\System32\config\SOFTWARE
ffffa58fa67b8840 6 15281600 152817ff 0 Mapped READONLY \Users\user\Desktop\test.dat
ffffa58fa67b8980 8 15281800 152819ff 0 Mapped READONLY \Windows\System32\config\SOFTWARE
[...]
What we have here are interleaved mappings of trusted and untrusted hives, each 2 MiB in length and tightly packed with 512 bins of 16 KiB each. Importantly, there are no gaps between the end of one mapping and the start of another, which means that it is indeed possible to use memory corruption within one hive to influence the internal representation of another. Take, for example, the boundary between the test.dat and SOFTWARE hives at address 0x15280400000. If we dump the memory area encompassing a few dozen bytes before and after this page boundary, we get the following result:
0: kd> db 0x15280400000-30
00000152803fffd0 41 41 41 41 41 41 41 41-41 41 41 41 41 41 41 41 AAAAAAAAAAAAAAAA
00000152803fffe0 41 41 41 41 41 41 41 41-41 41 41 41 41 41 41 41 AAAAAAAAAAAAAAAA
00000152803ffff0 41 41 41 41 41 41 41 41-41 41 41 41 00 00 00 00 AAAAAAAAAAAA....
0000015280400000 68 62 69 6e 00 f0 bf 0c-00 40 00 00 00 00 00 00 hbin.....@......
0000015280400010 00 00 00 00 00 00 00 00-00 00 00 00 00 00 00 00 ................
0000015280400020 20 c0 ff ff 42 42 42 42-42 42 42 42 42 42 42 42 ...BBBBBBBBBBBB
0000015280400030 42 42 42 42 42 42 42 42-42 42 42 42 42 42 42 42 BBBBBBBBBBBBBBBB
0000015280400040 42 42 42 42 42 42 42 42-42 42 42 42 42 42 42 42 BBBBBBBBBBBBBBBB
We can clearly see that the bytes belonging to both hives in question exist within a single, continuous memory area. This, in turn, means that memory corruption could indeed spread from one hive into the other. However, to successfully achieve this result, one would also need to ensure that the specific fragment of the target hive is marked as dirty. Otherwise, this memory page would be marked as PAGE_READONLY, which would lead to a system crash when attempting to write data, despite both regions being directly adjacent to each other.
After successfully corrupting data in a global, system hive, the remainder of the attack would likely involve either modifying a security descriptor to grant oneself write permissions to specific keys, or directly changing configuration data to enable the execution of one's own code with administrator privileges.
Attacking adjacent memory in pool-based hive mappings
Although hive file views are typically mapped in the user-mode space of the Registry process (which contains nothing else but these mappings), there are a few circumstances where this data is stored directly in kernel-mode pools. These cases are as follows:
- All volatile hives, which have no persistent representation as regf files on disk. Examples include the virtual hive rooted at \Registry, as well as the HKLM\HARDWARE hive.
- The entire HKLM\SYSTEM hive, including both its stable and volatile parts.
- All hives that have been recently created by calling one of the NtLoadKey* syscalls on a previously non-existent file, including newly created app hives.
- Volatile storage space of every active hive in the system.
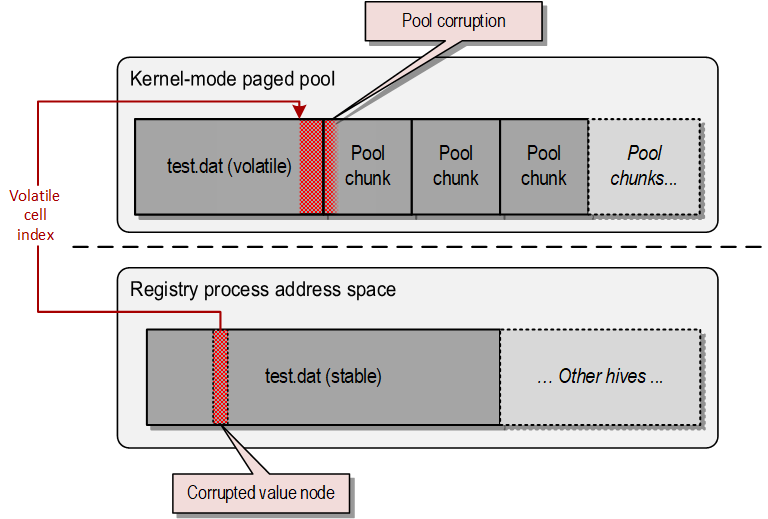
The first point is not useful to a potential attacker because these types of hives do not grant unprivileged users write permissions. The second and third points are also quite limited, as they could only be exploited through memory corruption that doesn't require binary control over the input hive. However, the fourth point makes it possible to exploit vulnerabilities in any hive in the system, including app hives. This is because creating volatile keys does not require any special permissions compared to regular keys. Additionally, if we have a memory corruption primitive within one storage type, we can easily influence data within the other. For example, in the case of stable storage memory corruption, it is enough to craft a value for which the cell index _CM_KEY_VALUE.Data has the highest bit set, and thus points to the volatile space. From this point, we can arbitrarily modify regf structures located in that space, and directly read/write out-of-bounds pool memory by setting a sufficiently long value size (exceeding the bounds of the given bin). Such a situation is shown in the diagram below:
This behavior can be further verified on a specific example. Let's consider the HKCU hive for a user logged into a Windows 11 system – it will typically have some data stored in the volatile storage due to the existence of the "HKCU\Volatile Environment" key. Let's first find the hive in WinDbg using the !reg hivelist command:
0: kd> !reg hivelist
| HiveAddr |Stable Length| Stable Map |Volatile Length| Volatile Map | BaseBlock | FileName
[...]
| ffff82828fc1a000 | ee000 | ffff82828fc1a128 | 5000 | ffff82828fc1a3a0 | ffff82828f8cf000 | ??\C:\Users\user\ntuser.dat
[...]
As can be seen, the hive has a volatile space of 0x5000 bytes (5 memory pages). Let's try to find the second page of this hive region in memory by translating its corresponding cell index:
0: kd> !reg cellindex ffff82828fc1a000 80001000
Map = ffff82828fc1a3a0 Type = 1 Table = 0 Block = 1 Offset = 0
MapTable = ffff82828fe6a000
MapEntry = ffff82828fe6a018
BinAddress = ffff82828f096009, BlockOffset = 0000000000000000
BlockAddress = ffff82828f096000
pcell: ffff82828f096004
It is a kernel-mode address, as expected. We can dump its contents to verify that it indeed contains registry data:
0: kd> db ffff82828f096000
ffff82828f096000 68 62 69 6e 00 10 00 00-00 10 00 00 00 00 00 00 hbin............
ffff82828f096010 00 00 00 00 00 00 00 00-00 00 00 00 00 00 00 00 ................
ffff82828f096020 38 ff ff ff 73 6b 00 00-20 10 00 80 20 10 00 80 8...sk.. ... ...
ffff82828f096030 01 00 00 00 b0 00 00 00-01 00 04 88 98 00 00 00 ................
ffff82828f096040 a4 00 00 00 00 00 00 00-14 00 00 00 02 00 84 00 ................
ffff82828f096050 05 00 00 00 00 03 24 00-3f 00 0f 00 01 05 00 00 ......$.?.......
ffff82828f096060 00 00 00 05 15 00 00 00-dc be 84 0b 6c 21 35 39 ............l!59
ffff82828f096070 b9 d0 84 88 ea 03 00 00-00 03 14 00 3f 00 0f 00 ............?...
Everything looks good. At the start of the page, there is a bin header, and at offset 0x20, we see the first cell corresponding to a security descriptor ('sk'). Now, let's see what the !pool command tells us about this address:
0: kd> !pool ffff82828f096000
Pool page ffff82828f096000 region is Paged pool
*ffff82828f096000 : large page allocation, tag is CM16, size is 0x1000 bytes
Pooltag CM16 : Internal Configuration manager allocations, Binary : nt!cm
We are dealing with a paged pool allocation of 0x1000 bytes requested by the Configuration Manager. And what is located right behind it?
0: kd> !pool ffff82828f096000+1000
Pool page ffff82828f097000 region is Paged pool
*ffff82828f097000 : large page allocation, tag is Obtb, size is 0x1000 bytes
Pooltag Obtb : object tables via EX handle.c, Binary : nt!ob
0: kd> !pool ffff82828f096000+2000
Pool page ffff82828f098000 region is Paged pool
*ffff82828f098000 : large page allocation, tag is Gpbm, size is 0x1000 bytes
Pooltag Gpbm : GDITAG_POOL_BITMAP_BITS, Binary : win32k.sys
The next two memory pages correspond to other, completely unrelated allocations on the pool: one associated with the NT Object Manager, and the other with the win32k.sys graphics driver. This clearly demonstrates that in the kernel space, areas containing volatile hive data are mixed with various other allocations used by other parts of the system. Moreover, this technique is attractive because it not only enables out-of-bound writes of controlled data, but also the ability to read this OOB data beforehand. Thanks to this, the exploit does not have to operate "blindly", but it can precisely verify whether the memory is arranged exactly as expected before proceeding with the next stage of the attack. With these kinds of capabilities, writing the rest of the exploit should be a matter of properly grooming the pool layout and finding some good candidate objects for corruption.
The ultimate primitive: out-of-bounds cell indexes
The situation is clearly not as hopeless as it might have seemed earlier, and there are quite a few ways to convert memory corruption in one's own hive space into taking control of other types of memory. All of them, however, have one minor flaw: they rely on prearranging a specific layout of objects in memory (e.g., hive mappings in the Registry process, or allocations on the paged pool), which means they cannot be said to be 100% stable or deterministic. The randomness of the memory layout carries the inherent risk that either the exploit simply won't work, or worse, it will crash the operating system in the process. For lack of better alternatives, these techniques would be sufficient, especially for demonstration purposes. However, I found a better method that guarantees 100% effectiveness by completely eliminating the element of randomness. I have hinted at or even directly mentioned this many times in previous blog posts in this series, and I am, of course, referring to out-of-bounds cell indexes.
As a quick reminder, cell indexes are the hive's equivalent of pointers: they are 32-bit values that allow allocated cells to reference each other. The translation of cell indexes into their corresponding virtual addresses is achieved using a special 3-level structure called a cell map, which resembles a CPU page table:
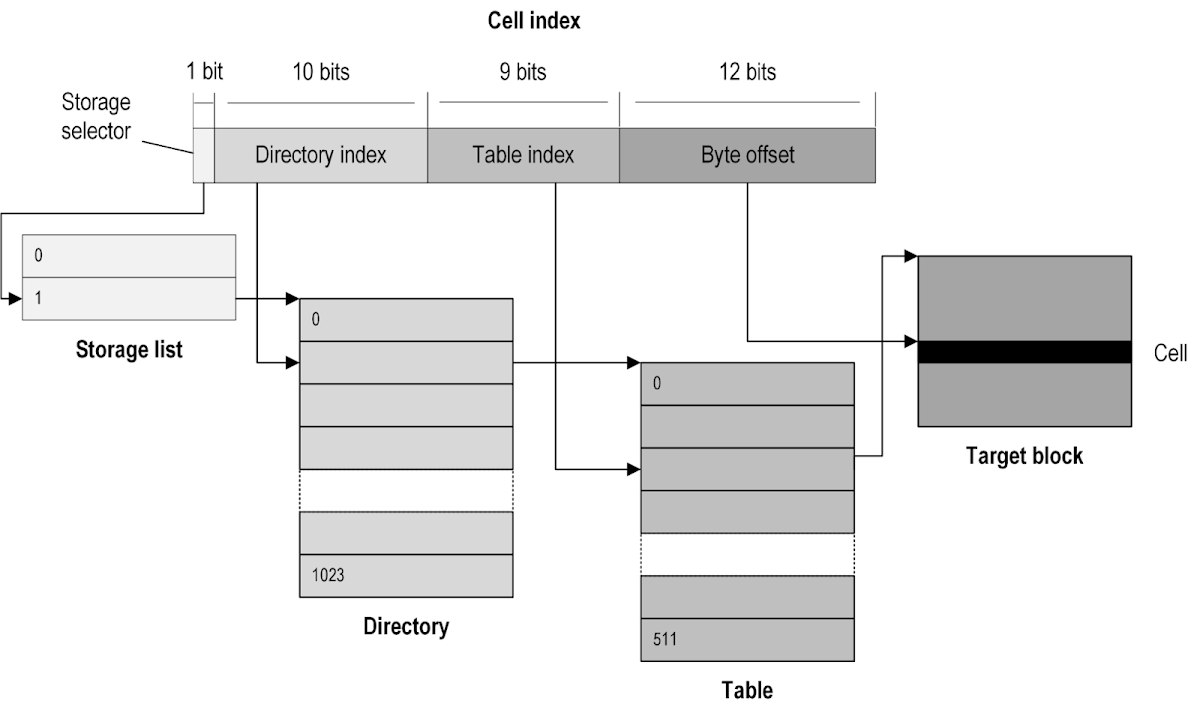
The C-like pseudocode of the internal HvpGetCellPaged function responsible for performing the cell map walk is presented below:
_CELL_DATA *HvpGetCellPaged(_HHIVE *Hive, HCELL_INDEX Index) {
_HMAP_ENTRY *Entry = &Hive->Storage[Index >> 31].Map
->Directory[(Index >> 21) & 0x3FF]
->Table[(Index >> 12) & 0x1FF];
return (Entry->PermanentBinAddress & (~0xF)) + Entry->BlockOffset + (Index & 0xFFF) + 4;
}
The structures corresponding to the individual levels of the cell map are _DUAL, _HMAP_DIRECTORY, _HMAP_TABLE and _HMAP_ENTRY, and they are accessible through the _CMHIVE.Hive.Storage field. From an exploitation perspective, two facts are crucial here. First, the HvpGetCellPaged function does not perform any bounds checks on the input index. Second, for hives smaller than 2 MiB, Windows applies an additional optimization called "small dir". In that case, instead of allocating the entire Directory array of 1024 elements and only using one of them, the kernel sets the _CMHIVE.Hive.Storage[...].Map pointer to the address of the _CMHIVE.Hive.Storage[...].SmallDir field, which simulates a single-element array. In this way, the number of logical cell map levels remains the same, but the system uses one less pool allocation to store them, saving about 8 KiB of memory per hive. This behavior is shown in the screenshot below:
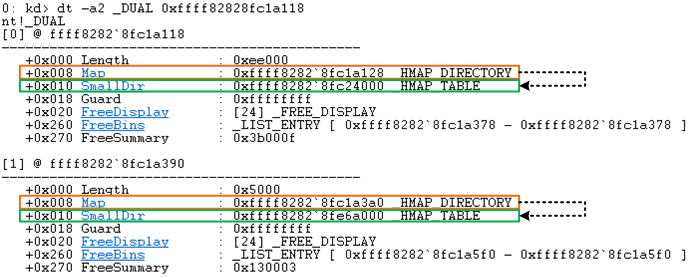
What we have here is a hive that has a stable storage area of 0xEE000 bytes (952 KiB) and a volatile storage area of 0x5000 bytes (20 KiB). Both of these sizes are smaller than 2 MiB, and consequently, the "small dir" optimization is applied in both cases. As a result, the Map pointers (marked in orange) point directly to the SmallDir fields (marked in green).
This situation is interesting because if the kernel attempts to resolve an invalid cell index with a value of 0x200000 or greater (i.e., with the "Directory index" part being non-zero) in the context of such a hive, then the first step of the cell map walk will reference the out-of-bounds Guard, FreeDisplay, etc. fields as pointers. This situation is illustrated in the diagram below:
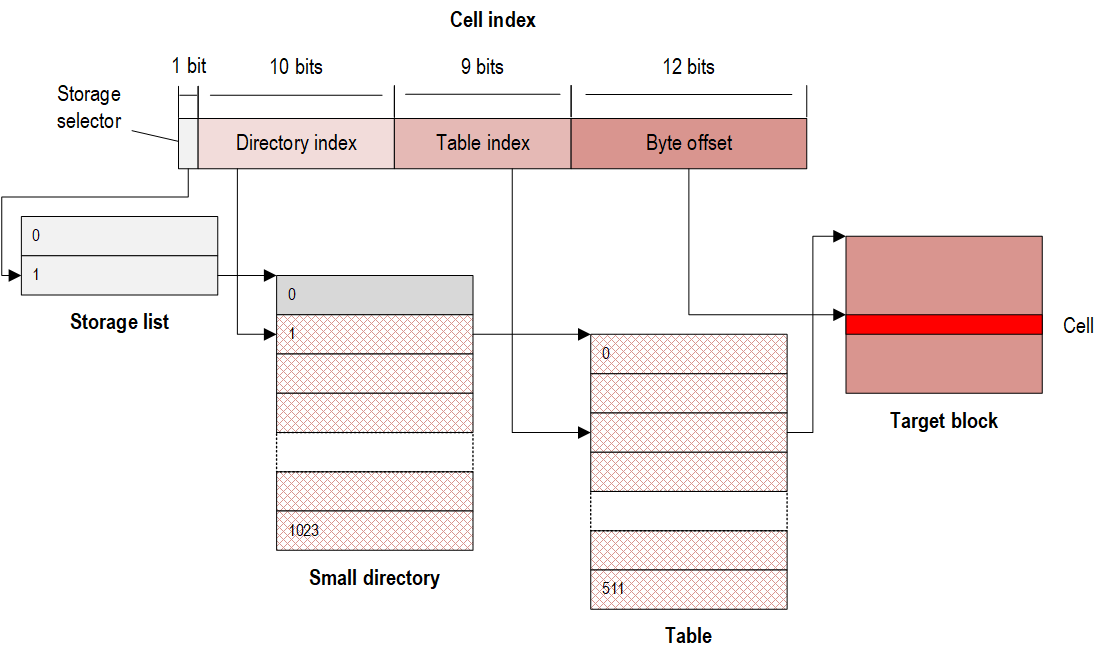
In other words, by fully controlling the 32-bit value of the cell index, we can make the translation logic jump through two pointers fetched from out-of-bounds memory, and then add a controlled 12-bit offset to the result. An additional consideration is that in the first step, we reference OOB indexes of an "array" located inside the larger _CMHIVE structure, which always has the same layout on a given Windows build. Therefore, by choosing a directory index that references a specific pointer in _CMHIVE, we can be sure that it will always work the same way on a given version of the system, regardless of any random factors.
On the other hand, a small inconvenience is that the _HMAP_ENTRY structure (i.e., the last level of the cell map) has the following layout:
0: kd> dt _HMAP_ENTRY
nt!_HMAP_ENTRY
+0x000 BlockOffset : Uint8B
+0x008 PermanentBinAddress : Uint8B
+0x010 MemAlloc : Uint4B
And the final returned value is the sum of the BlockOffset and PermanentBinAddress fields. Therefore, if one of these fields contains the address we want to reference, the other must be NULL, which may slightly narrow down our options.
If we were to create a graphical representation of the relationships between structures based on the pointers they contain, starting from _CMHIVE, it would look something like the following:
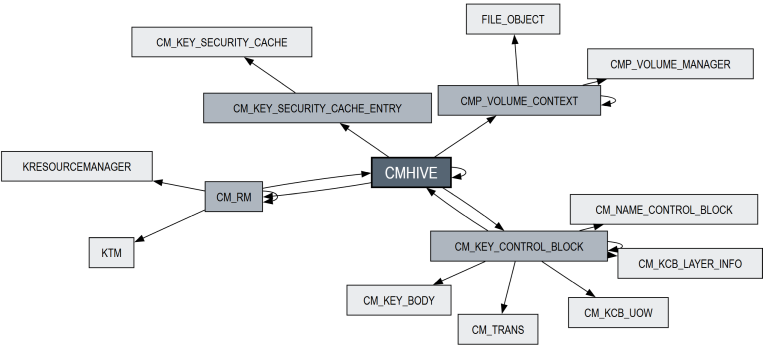
The diagram is not necessarily complete, but it shows an overview of some objects that can be reached from _CMHIVE with a maximum of two pointer dereferences. However, it is important to remember that not every edge in this graph will be traversable in practice. This is because of two reasons: first, due the layout of the _HMAP_ENTRY structure (i.e. 0x18-byte alignment and the need for a 0x0 value being adjacent to the given pointer), and second, due to the fact that not every pointer in these objects is always initialized. For example, the _CMHIVE.RootKcb field is only valid for app hives (but not for normal hives), while _CMHIVE.CmRm is only set for standard hives, as app hives never have KTM transaction support enabled. So, the idea provides some good foundation for our exploit, but it does require additional experimentation to get every technical detail right.
Moving on, the !reg cellindex command in WinDbg is perfect for testing out-of-bounds cell indexes, because it uses the exact same cell map walk logic as HvpGetCellPaged, and it doesn't perform any additional bounds checks either. So, let's stick with the HKCU hive we were working with earlier, and try to create a cell index that points back to its _CMHIVE structure. We'll use the _CMHIVE → _CM_RM → _CMHIVE path for this. The first decision we need to make is to choose the storage type for this index: stable (0) or volatile (1). In the case of HKCU, both storage types are non-empty and use the "small dir" optimization, so we can choose either one; let's say volatile. Next, we need to calculate the directory index, which will be equal to the difference between the offsets of the _CMHIVE.CmRm and _CMHIVE.Hive.Storage[1].SmallDir fields:
0: kd> dx (&((nt!_CMHIVE*)0xffff82828fc1a000)->Hive.Storage[1].SmallDir)
(&((nt!_CMHIVE*)0xffff82828fc1a000)->Hive.Storage[1].SmallDir) : 0xffff82828fc1a3a0 [Type: _HMAP_TABLE * *]
0xffff82828fe6a000 [Type: _HMAP_TABLE *]
0: kd> dx (&((nt!_CMHIVE*)0xffff82828fc1a000)->CmRm)
(&((nt!_CMHIVE*)0xffff82828fc1a000)->CmRm) : 0xffff82828fc1b038 [Type: _CM_RM * *]
0xffff82828fdcc8e0 [Type: _CM_RM *]
In this case, it is (0xffff82828fc1b038 - 0xffff82828fc1a3a0) ÷ 8 = 0x193. The next step is to calculate the table index, which will be the offset of the _CM_RM.CmHive field from the beginning of the structure, divided by the size of _HMAP_ENTRY (0x18).
0: kd> dx (&((nt!_CM_RM*)0xffff82828fdcc8e0)->CmHive)
(&((nt!_CM_RM*)0xffff82828fdcc8e0)->CmHive) : 0xffff82828fdcc930 [Type: _CMHIVE * *]
0xffff82828fc1a000 [Type: _CMHIVE *]
So, the calculation is (0xffff82828fdcc930 - 0xffff82828fdcc8e0) ÷ 0x18 = 3. Next, we can verify where the CmHive pointer falls within the _HMAP_ENTRY structure.
0: kd> dt _HMAP_ENTRY 0xffff82828fdcc8e0+3*0x18
nt!_HMAP_ENTRY
+0x000 BlockOffset : 0
+0x008 PermanentBinAddress : 0xffff82828fc1a000
+0x010 MemAlloc : 0
_CM_RM.CmHive 指针与 PermanentBinAddress 字段对齐,这是个好消息。此外,BlockOffset 字段为零,这也是可取的。在内部,它对应于 ContainerSize 字段,如果在此会话期间未对配置单元执行任何 KTM 事务,则该字段会被清零——这对我们的示例来说足够了。
我们现在已经计算了四个单元索引元素中的三个,最后一个是偏移量,我们将其设置为零,因为我们希望从最开始访问 _CMHIVE 结构。是时候将所有信息汇总在一起了;我们可以使用一个简单的 Python 函数构建最终的单元索引:
def MakeCellIndex(storage, directory, table, offset):
... print("0x%x" % ((storage << 31) | (directory << 21) | (table << 12) | offset))
...
然后传入我们已确定的值:
MakeCellIndex(1, 0x193, 3, 0)
0xb2603000
因此,指向给定配置单元的 _CMHIVE 结构的最终越界单元索引是 0xB2603000。现在该在 WinDbg 中验证这个神奇的索引是否真的按预期工作了。
0: kd> !reg cellindex ffff82828fc1a000 b2603000
Map = ffff82828fc1a3a0 Type = 1 Table = 193 Block = 3 Offset = 0
MapTable = ffff82828fdcc8e0
MapEntry = ffff82828fdcc928
BinAddress = ffff82828fc1a000, BlockOffset = 0000000000000000
BlockAddress = ffff82828fc1a000
pcell: ffff82828fc1a004
确实,作为命令输入传入的 _CMHIVE 地址也出现在其输出中,这意味着我们的技术有效(输出地址中额外的 0x4 是为了考虑单元大小)。如果我们将此索引插入 _CM_KEY_VALUE.Data 字段,我们将能够通过注册表值读取和写入内核内存中的 _CMHIVE 结构。这代表了本地攻击者手中非常强大的能力。
编写漏洞利用程序
在这个阶段,我们已经有了一个坚实的计划,关于如何利用初始的配置单元内存损坏原语进行进一步的权限提升。是时候选择一个特定的漏洞并开始为其编写实际的漏洞利用程序了。下面详细描述了这个过程。
步骤 0:选择漏洞
面对大约17 个与配置单元内存损坏相关的漏洞,直接的挑战是选择一个用于演示的漏洞利用程序。虽然这些漏洞中的任何一个最终都可以通过时间和实验被利用,但它们的难度各不相同。还有一个审美考虑:出于演示目的,如果漏洞利用的操作能在 Regedit 中可见,那将是理想的,这缩小了我们的选择范围。尽管如此,由于仍有大量选择,我们应该能够确定一个合适的候选者。让我们简要地看一下两种不同的可能性。
CVE-2022-34707
在注册表上下文中,我首先想到的漏洞总是CVE-2022-34707。这部分是因为它是我在这项研究中手动发现的第一个漏洞,但主要是因为它的利用非常方便。这个漏洞的本质是,可以加载一个安全描述符包含非常接近最大 32 位值(例如 0xFFFFFFFF)的引用计数的配置单元,然后通过创建更多使用它的键来使其溢出。这导致了一个非常强大的 UAF 原语,因为错误释放的单元随后可以被新对象填充,然后可以任意次地再次释放。通过这种方式,可以实现几种不同类型对象的类型混淆,例如,通过将同一单元随后重新用作安全描述符 → 值节点 → 值数据后备单元,我们可以轻松地控制 _CM_KEY_VALUE 结构,从而允许我们使用越界单元索引继续攻击。
由于其特性,这个漏洞也是我在这项研究中第一个编写了完整漏洞利用程序的漏洞。我在这里描述的许多技术都是在处理这个漏洞时发现的。此外,博客文章 #1末尾展示权限提升的截图说明了 CVE-2022-34707 的成功利用。然而,在这篇博客文章的上下文中,它有一个根本性的缺陷:要将初始引用计数设置为接近溢出 32 位范围的值,需要手动制作输入的 regf 文件。这意味着目标只能是应用程序配置单元,因此我们将无法直接在注册表编辑器中观察到利用过程。这将大大降低我直观演示漏洞利用的能力,这最终促使我寻找更好的漏洞。
CVE-2023-23420
这就引出了第二个漏洞,CVE-2023-23420。这也是配置单元内的一个 UAF 条件,但它涉及的是键节点单元而不是安全描述符单元。它是由事务性键重命名操作中的某些问题引起的。这些问题如此深入,影响了注册表如此基本的方面,以至于这个漏洞以及相关的漏洞 CVE-2023-23421、CVE-2023-23422 和 CVE-2023-23423 通过完全移除对事务性键重命名操作的支持来修复。
在利用方面,这个漏洞特别独特,因为它可以仅使用 API/系统调用来触发,使得攻击者有可能损坏任何他们具有写访问权限的配置单元。这使其成为编写漏洞利用程序的理想候选者,其操作可以使用标准的 Windows 注册表工具肉眼可见,所以我们将这样做。尽管在这里将配置单元布局调整到所需状态的具体细节可能比 CVE-2022-34707 稍微困难一些,但没有什么是我们无法处理的。那么,开始工作吧!
步骤 1:滥用 UAF 建立动态控制的值单元
首先需要澄清的是,我们的攻击将针对 HKCU 配置单元,更具体地说是其易失性存储空间。希望这能使漏洞利用更可靠一些,因为易失性空间在每次重新加载配置单元时都会重置,并且通常那里没有太多活动发生。利用过程始于键节点的释放后重用,我们的目标是在第一阶段结束时完全控制两个注册表值的 _CM_KEY_VALUE 表示(为什么是两个——我们稍后会讲到)。一旦实现这个目标,我们将能够任意设置 _CM_KEY_VALUE.Data 字段,从而获得对任何选定的越界单元索引的读/写访问权限。实现这一目标有许多不同的方法,但在我的概念验证中,我从以下数据布局开始:
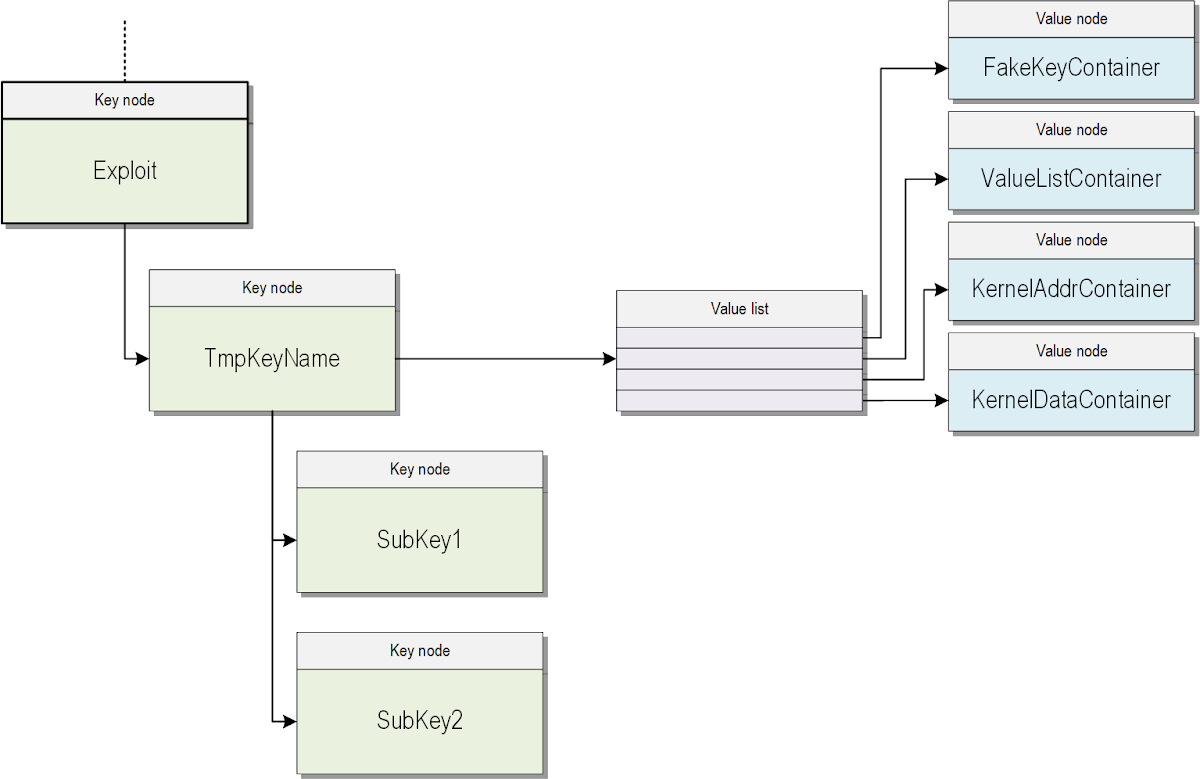
层次结构的顶部是 HKCU\Exploit 键,它是整个漏洞利用子树的根。它的唯一作用是作为我们创建的所有其他键和值的容器。在它下面,我们有"TmpKeyName"键,它之所以重要有两个原因:首先,它存储了四个值,这些值将在后续阶段用于用受控数据填充已释放的单元(但目前为空)。其次,这是我们将执行"重命名"操作的键,这是 CVE-2023-23420 漏洞的基础。在它下面还有两个键,"SubKey1"和"SubKey2",它们也是利用过程中通过其父键的不同视图进行事务性删除所必需的。
一旦我们在配置单元中安排好了这种数据布局,就可以继续触发内存损坏。我们可以完全按照原始报告中"操作事务性重命名键的子键"部分的描述以及相应的InconsistentSubkeyList.cpp源代码中的演示来进行。简而言之,它涉及以下步骤:
- 通过调用 NtCreateRegistryTransaction 系统调用来创建一个轻量级事务。
- 在我们新创建的事务中打开两个指向 HKCU\Exploit\TmpKeyName 键的不同句柄。
- 对其中一个句柄执行事务性重命名操作,将名称更改为"Scratchpad"。
- 通过不同的父句柄(一个已重命名,一个未重命名)事务性地删除"SubKey1"和"SubKey2"键。
- 通过调用 NtCommitRegistryTransaction 系统调用来提交整个事务。
在易受攻击的系统上成功执行这些操作后,我们配置单元内对象的布局应相应改变:
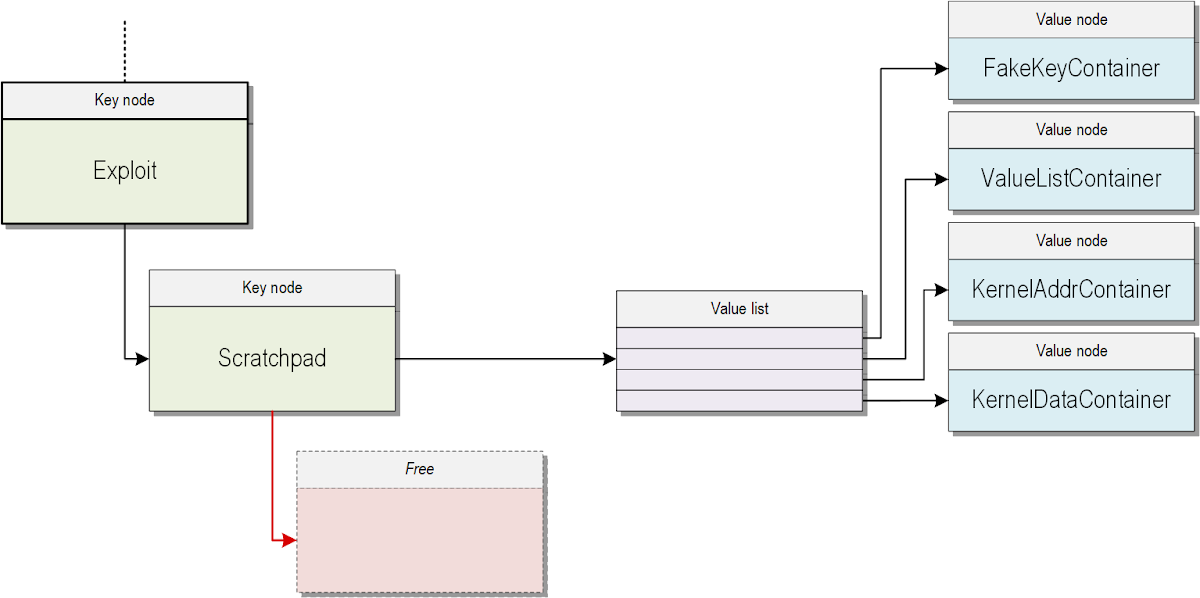
我们看到"TmpKeyName"键已重命名为"Scratchpad",并且它的两个子键都已释放,但第二个子键的已释放单元仍然出现在其父键的子键列表中。此时,我们希望使用"Scratchpad"键的四个值来创建我们自己的伪造数据结构。根据它,已释放的子键仍将显示为存在,并包含两个名为"KernelAddr"和"KernelData"的值。每个"Container"值负责模仿一种类型的对象,其中最关键的角色由"FakeKeyContainer"值扮演。它的后备缓冲区必须与先前与"SubKey1"键节点关联的内存完美对齐。下图说明了期望的结果:
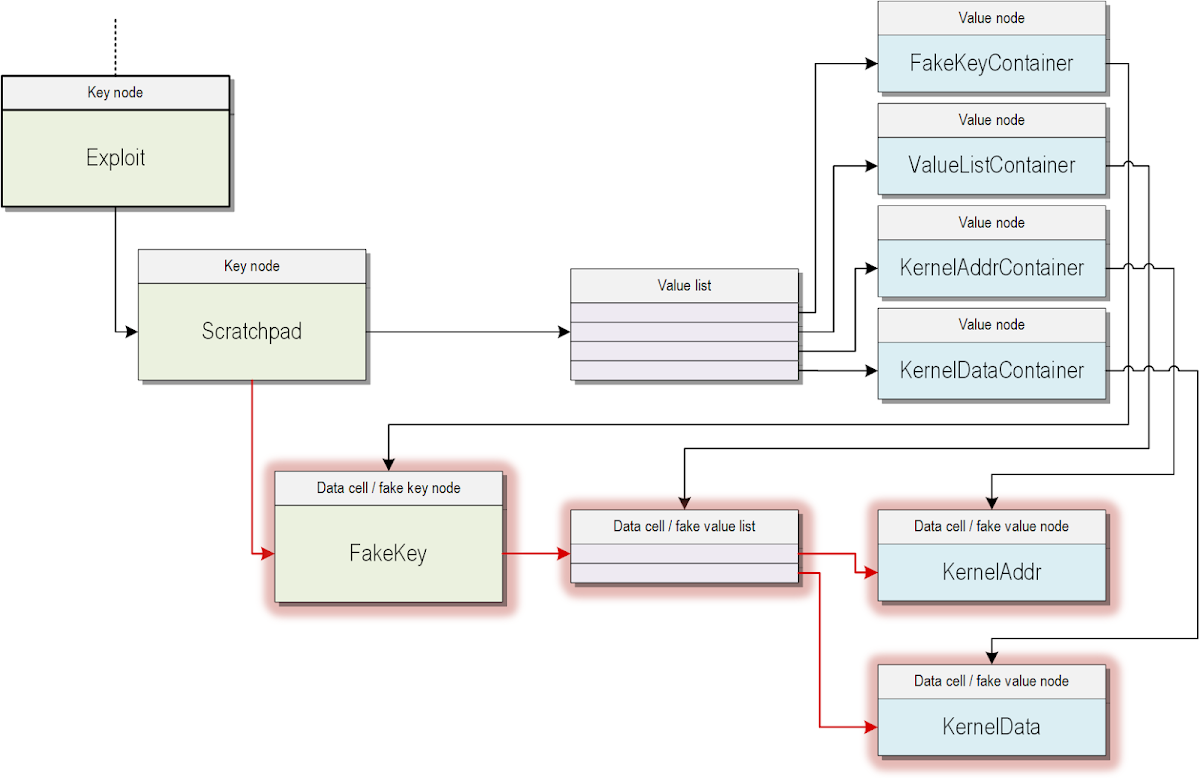
所有突出显示的单元都包含攻击者控制的数据,这些数据代表了描述 HKCU\Exploit\Scratchpad\FakeKey 键及其两个值的有效 regf 结构。一旦实现了这种数据布局,就可以使用标准 API(如RegOpenKeyEx)打开"FakeKey"的句柄,然后通过其值操作任意单元索引。实际上,在触发 UAF 后制作这些对象的过程比仅仅为四个不同的值设置数据稍微复杂一些,需要以下步骤:
- 向"FakeKeyContainer"值写入"FakeKey"键的初始基本表示。在这个阶段,键节点不完全正确并不重要,但它必须具有适当的长度,从而精确覆盖当前由"Scratchpad"键的子键列表指向的已释放单元。
- 为其他三个容器值设置数据——同样,还不是最终数据,而是那些具有适当长度并填充了唯一标记的数据,以便以后可以轻松识别。
- 启动信息泄露循环,以找到对应于"ValueListContainer"、"KernelAddrContainer"和"KernelDataContainer"值的数据单元的单元索引,以及有效安全描述符的单元索引。此逻辑依赖于滥用"FakeKey"的 _CM_KEY_NODE.Class 和 _CM_KEY_NODE.ClassLength 字段,使它们指向我们想要读取的配置单元中的数据。具体来说,ClassLength 成员设置为 0xFFC,Class 成员在后续循环迭代中设置为索引 0x80000000、0x80001000、0x80002000……这实现了一种"任意配置单元读取"原语,读取可以通过在"Scratchpad"键上调用带有 KeyNodeInformation 类的 NtEnumerateKey 系统调用来实现,该调用返回给定子键的类属性等。这样,我们获得了构建每个模仿单元的最终形式所需的所有关于内部配置单元布局的信息。
- 使用上述信息为四个单元中的每一个设置正确的数据:"FakeKey"键的键节点(带有有效的安全描述符和指向值列表的索引)、值列表本身以及"KernelAddr"和"KernelData"的值节点。这使得"FakeKey"成为 Windows 眼中一个功能齐全的键,但其所有内部 regf 结构完全由我们控制。
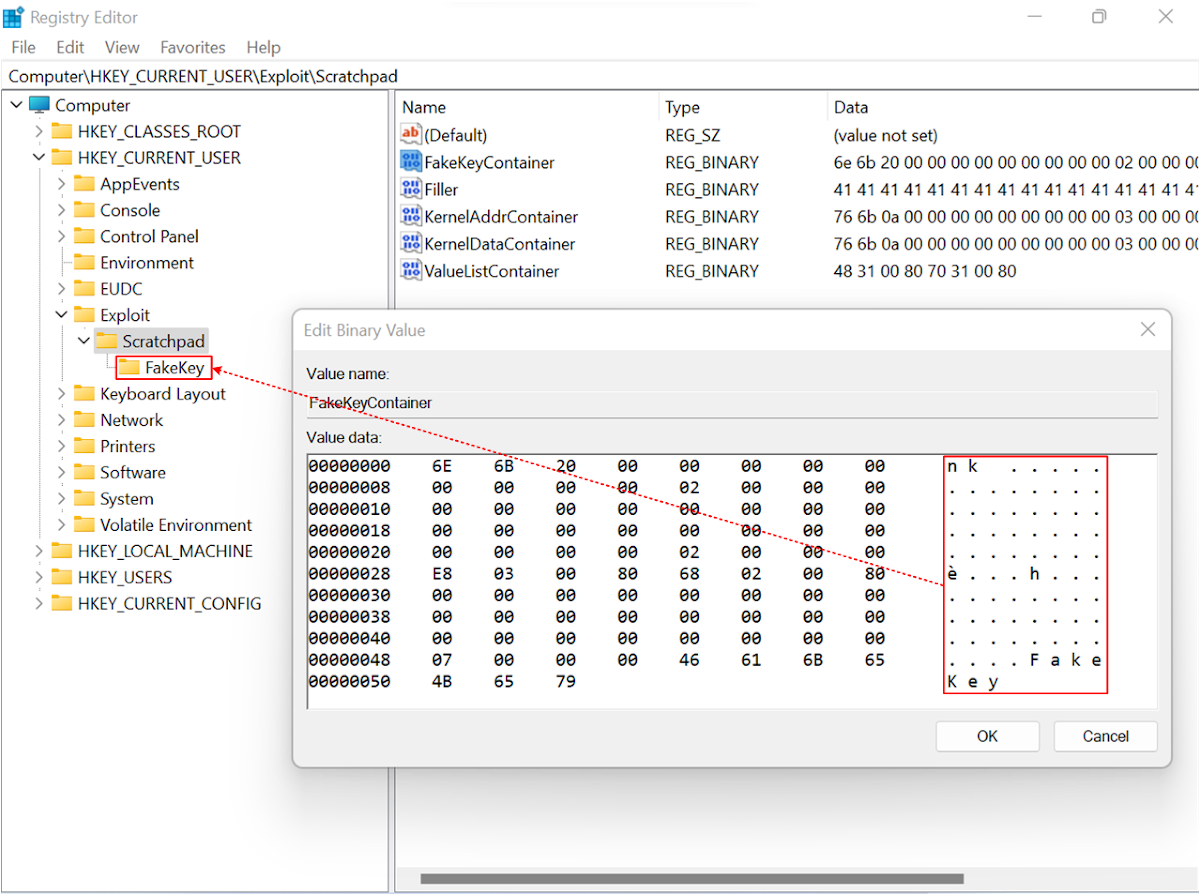
如果所有这些步骤都成功,我们应该能够在 Regedit 中打开 HKCU\Exploit\Scratchpad 键并查看当前的利用进度。我的测试系统示例如下截图所示。额外的"Filler"值用于填充在重命名操作期间释放的旧"TmpKeyName"键节点所占用的空间。这是必要的,以便"FakeKeyContainer"值的数据与"SubKey1"键的已释放单元正确对齐,但为了清晰起见,我在上述逻辑的高级描述中跳过了这个次要的实现细节。
步骤 2:获取对 CMHIVE 内核对象的读/写访问权限
既然我们现在完全控制了一些注册表值,下一个合乎逻辑的步骤就是用特制的 OOB 单元索引初始化它们,然后检查我们是否真的可以访问它所代表的内核结构。假设我们将"KernelData"值的类型设置为 REG_BINARY,长度设置为 0x100,数据单元索引设置为先前计算的值 0xB2603000,该值应指向内核池中配置单元的 _CMHIVE 结构。如果我们这样做,然后在注册表编辑器中浏览到"FakeKey"键,我们将遇到一个不愉快的意外:
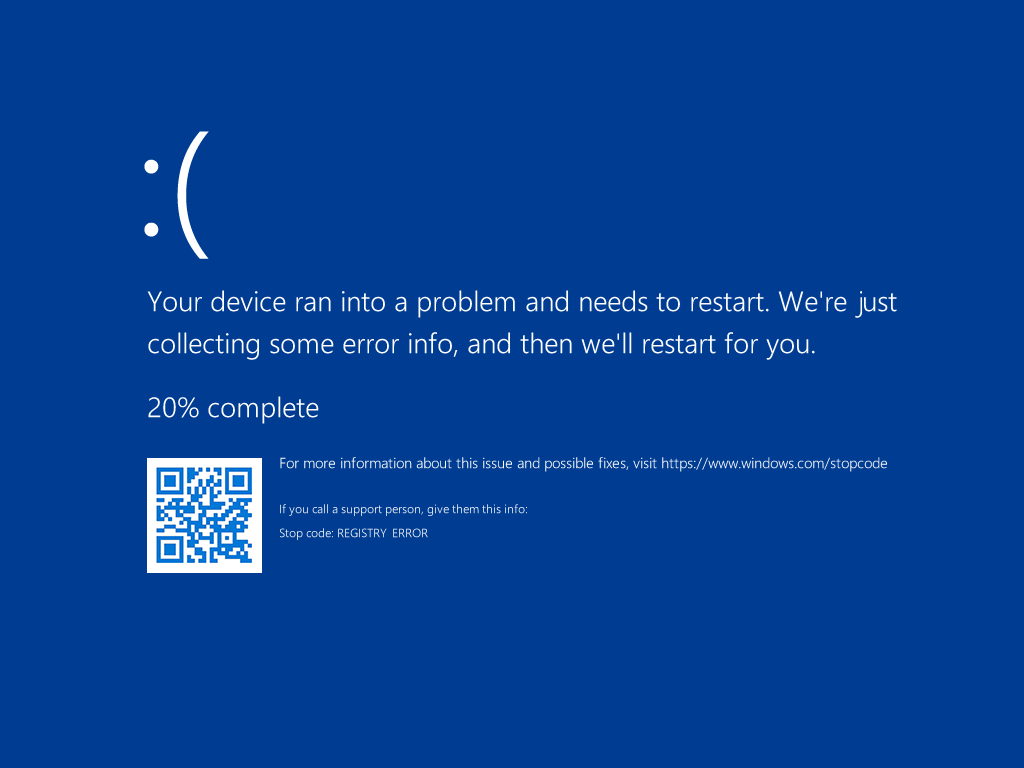
这绝对不是我们期望的结果,一定是出了问题。如果我们在 WinDbg 中调查系统崩溃,将获得以下信息:
Break instruction exception - code 80000003 (first chance)
A fatal system error has occurred.
Debugger entered on first try; Bugcheck callbacks have not been invoked.
A fatal system error has occurred.
nt!DbgBreakPointWithStatus:
fffff8008061ff20 cc int 3
0: kd> !analyze -v
* *
* Bugcheck Analysis *
* *
REGISTRY_ERROR (51)
Something has gone badly wrong with the registry. If a kernel debugger
is available, get a stack trace. It can also indicate that the registry got
an I/O error while trying to read one of its files, so it can be caused by
hardware problems or filesystem corruption.
It may occur due to a failure in a refresh operation, which is used only
in by the security system, and then only when resource limits are encountered.
Arguments:
Arg1: 0000000000000001, (reserved)
Arg2: ffffd4855dc36000, (reserved)
Arg3: 00000000b2603000, depends on where Windows BugChecked, may be pointer to hive
Arg4: 000000000000025d, depends on where Windows BugChecked, may be return code of
HvCheckHive if the hive is corrupt.
[...]
0: kd> k
Child-SP RetAddr Call Site
00 ffff828bb100be68 fffff80080763642 nt!DbgBreakPointWithStatus
01 ffff828bb100be70 fffff80080762e81 nt!KiBugCheckDebugBreak+0x12
02 ffff828bb100bed0 fffff80080617957 nt!KeBugCheck2+0xa71
03 ffff828bb